Fiddlewidget
| Home | What's a Fiddlewidget? | Suppliers | Fiddlewidget University | Instruments |
Modifying and Customizing Your Fiddlewidget
Things you can do to make it more like your own instrument
This might be more reading than you want to do; basically what it involves is temporarily marking up the clear window with a dry-erase marker to highlight certain notes and scales of interest, and marking the slide to make it look like your instrument and give you a reference point to keep you from getting lost. If you want more details and pictures, read on.
Once you get comfortable with the widget layout and how to use it, you will probably think of some things you wish it had. Not everybody thinks of the same things, so I leave the tool pretty plain to keep from over-complicating it, but that doesn't mean you can't fix yours the way you want.
Modifying the Window
One nice thing to keep in mind is, you can temporarily mark up that clear plastic window with a dry-erase marker, and then rub it off after you're done without permanently changing anything.
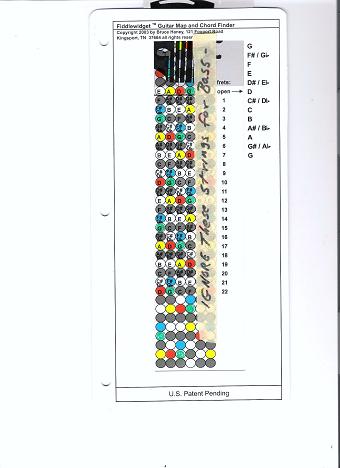
A couple years ago, I took some bass lessons, just to learn enough so I could pick up a standup bass in a jam session and thump along on some simple tunes. I didn't even have a bass Fiddlewidget done at the time, so I had to use a guitar widget and just ignore the two highest strings, (actually I put tape over that part of the display) but here's what I did to the window:
With a green dry-erase marker, I colored every circle on the window corresponding to the "4" note. That's the one between the blue "3" and the yellow "5" on each string. This drew my eye immediately to the "4" note whenever I wanted to play the "4" chord---hitting the green circle and then the note adjacent to it on the next lower string gave me the "4-1" sequence for the key I was in, or the "1-5" notes of the "4" chord, however you want to look at it. This might seem confusing, but if you get out your guitar and try it on the lowest four strings, you?ll find that this pattern holds up, all over the neck, for any key you want. The modifications on the window make these real easy to see. You could do the same color modification with the regular bass widget that is available now, or just use the guitar tool like I did. That way you could have one tool function for two different instruments if you also play guitar.
Here is a scan of that guitar Fiddlewidget that I modified to use for learning bass; it's set to display the key of D. This is probably the beginning standup bass player's favorite key, because you can play the 1,4, and 5 chords all on the open strings; D-A for the 1 chord, G-D for the 4 chord, and A-E for the 5 chord.
I got an email recently from Ross Cherednik, who wrote a ton of mandolin and ukulele books that are still in print and available from Mel Bay. Ross suggested a 4th color on the mandolin Fiddlewidget to mark the 7th note; this is what jazz and rock players like to use a lot in the music they play. I think the market may be a little thin for me to make them all that way, but------ If that's what you're looking for, and you want to create a visual map highlighting the 7ths, it would be easy to do the same kind of thing by using a 4th color dry erase marker to mark them on the window.
Modes-----
For working in different scale modes, you can mark the root note in another scale mode having the same key signature as the major scale the widget is set on. This is getting into more theory than I'm really comfortable with, but, say you are working in Dorian mode, key of A Dorian; you could set the widget to the key of G (same key signature) and mark the "2" notes of that key with another color. Start on the 2, play the same notes as displayed on the Fiddlewidget, and, bam! There's the A Dorian scale.
When you've had enough of it, just wipe the dry-erase marker off and you're back to square one again.
Now, if you leave that dry-erase ink on there for more than a couple days, it becomes permanent enough that you will have to work to get it off. That will require using the solvent they make for cleaning dry-erase boards, or rubbing alcohol or some such thing, but you can still take it off with elbow grease and patience. Or if you decide you like it, just leave it there or repeat the process with a permanent marker.
Modifying the Slide
Note that anything you do to the slide is going to be permanent; it is permeable to even dry-erase inks, so they will not rub off like they will on the plastic window. If you want to make a temporary slide change, you might try putting a piece of clear tape on it first, and keeping your markings to the tape. That will make the fit a little tighter, but might be just what you want. That said, the slide is intended to be a generic picture of the instrument neck, but it can be made to look more like YOUR instrument if you want it to.
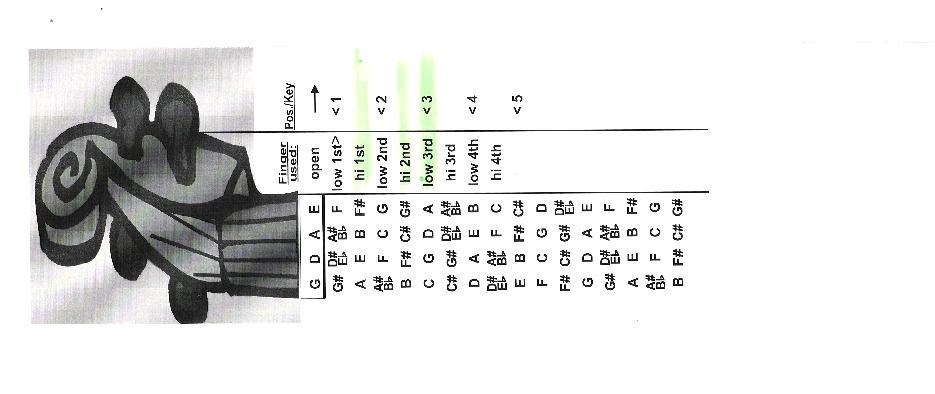
I don't have little strips of tape across my fiddle fingerboard like I used to, but I have an eleven year-old student who does, and she was having difficulty relating the Fiddlewidget to the actual fiddle. We marked her slide with a green marker at the places where her fiddle was taped, and it helped nail things down for her a lot. I found that it also kept ME from getting lost, so I marked my own slide as well. Just the right-hand part of the slide where I didn't cover up the note names.
This is a scan of my actual slide, with the high first, high second and low third finger positions highlighted. It doesn't need to look like anything special, but it's a real "stake in the ground" reference point that you can always find easily, no matter where you are with the widget settings.
The point of all this is, we don't all like the same things. I'm keeping the Fiddlewidget as simple and basic as I can, so everybody can understand it and use it. Beyond that, individuals can mark up and modify their personal copy to fit their own needs and learning styles.
Like the high school orchestra player who put a red dot on her slide where she had placed a red sticker on her fingerboard to mark the 3rd position.
Or the guitar player who put position markers on his slide to mimic the position markers on his guitar neck.
And if you've read this far, I'll make another offer - if you modify yours and you've messed it up, send it back to me and I'll replace it for 2 bucks and $1 for the shipping costs. That will allow you to experiment some without having much at risk.